
How To Use The Computer Wire(Cable) Stripping Machine : Cable(Wire) Peeling Machine
How To Use The Computer Wire Stripping Machine
Advantages of computer wire stripping machine in wire harness equipment industry
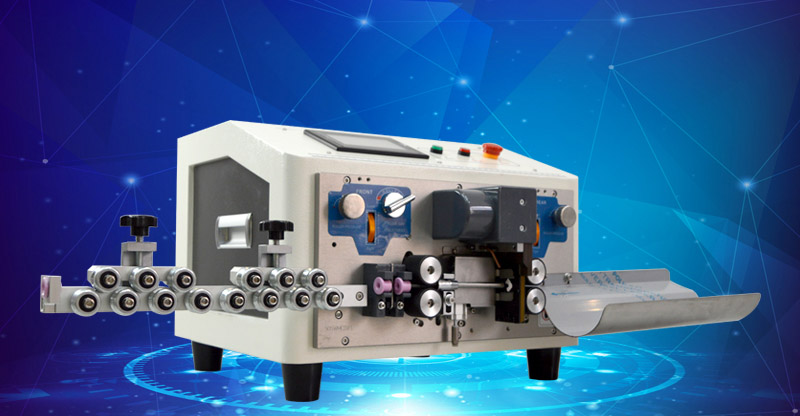
The computer copper wire stripping machine is an electronic wire processing equipment. Its function is mainly to cut and strip, which replaces the low efficiency of early manual wire stripping. Because it is a computer control program, it is more convenient to operate.
The use of computer stripping machines has become a need in many industries, because this kind of equipment can bring better stripping effects, and the length of the strip can be specifically planned. Of course, different choices must be made according to the thickness of the wire. Model of wire stripping and cutting machine, so as to meet the specific operation needs. Of course, you must pay attention to the specific method for the use of this equipment. Therefore, the operation manual of the computer automatic copper wire stripping machine is very important, and the operation method can be correctly understood through this manual.
The operation manual of the computer copper wire cable stripping machine is very important. Although the operation of this equipment is not very complicated, you must pay attention to the correct method if you want to use it. First, turn on the power and see that the indicator light is on. It depends on the buttons. Press the up and down buttons to select the program, speed, line length, etc., but the specific data settings should be done according to actual needs. If you are not very clear about this operation, you can also use the manufacturer’s after-sales personnel to come The process of obtaining professional guidance services is relatively simple.
You can also master more specific operation methods through the computer electric copper wire stripping machine operating instructions. Of course, after completing the basic settings, you should also pay attention to the output that does not need to be operated, but the up and down keys also need to select the wire end, stripping head, and wire end. , Peel the tail, this is beneficial to the subsequent operations, so there are still many points that need to be paid attention to in the specific operation. Of course, because it is a computer setting operation, some details should be paid attention to when setting. However, current professional manufacturers will have detailed operating instructions, and will also provide professional technical guidance on the sales platform to ensure that they can be used correctly.

Types of wire stripping machine
From the perspective of the types of wire stripping, computer wire stripping machines include wire stripping machines for stripping electronic wires, automatic scrap copper wire recycling and stripping machines for stripping scrap copper wires, and manual scrap copper wire stripping machines, wire cut and strip machine as well as those driven by electric drills like drill powered wire stripper. Semi-automatic scrap copper wire stripping machine that can improve efficiency, from the perspective of the size of the wire stripping, it always includes small wire stripping machine, large cable stripping machine and heavy-duty wire stripping machine. Finally, there is a wire stripper called a coaxial wire stripping machine
The debugging process of the wire stripping machine
Debugging process: plug in the power supply, start the machine, and set the parameters directly according to the above display, such as: cutting wire length, stripping length, wire diameter knife value, speed, etc., test stripping 2 wires, and mass production can be performed if the test meets the requirements.
Wire stripping machine: It generally refers to a machine that adopts intelligent system control, is driven by a motor, and completes the function of wire processing through a knife holder. Due to the difference of wires, it can be roughly divided into: ultra-short wire type machine, automatic wire cutting and twisting type machine, and special type for stripping sheathing wire machine, Flat line type and coaxial wire stripping type machine.
Working process of automatic computer stripping machine
1. Wire feed
Wire feeding equipment: Put the required processing wire on the transfer wire rack.
Required equipment: wire feeder, wire feeder.
Process requirements: Be careful not to scratch the surface of the wire with the cutter. Avoid different wire tightness when multiple wires are processed at the same time.
2. Cable Cutting
Wire cutting: Use a wire cutting machine to cut the wire to the required length.
Equipment needed: computer wire cutting machine, multi-function wire cutting machine, wire cutting and peeling machine.
Process requirements: Do not cut the surface of the wire; do not cut the copper wire; the error of the stripping length is not allowed to exceed ±1mm.
3. wire Peeling
Wire stripping: Strip the insulation covering of the corresponding length of the wire at the joint according to the requirements of SOP.
Equipment needed: wire cutting and peeling machine, vertical peeling machine, pneumatic peeling machine.
Process requirements: The surface is not allowed to be crushed; the stripping length error is not allowed to exceed ±1mm.
4. Twisted wire
Twisting: Arrange and twist the conductors at the joints.
Equipment needed: wire cutting, peeling and twisting machine, wire cutting and twisting machine.
Process requirements: scratches and scratches on the surface of the wire are not allowed; the copper wire must be tightened to prevent loose wires.
5. Crimp terminals
Riveting terminal: Riveting the conductor and the plug terminal at the joint.
Required equipment: terminal machine, single and double-head terminal machine, automatic terminal machine, copper strip machine, silent terminal machine.
Process requirements: The terminal is not deformed and must meet the requirements of tension and riveting height and width.
6. immersion tin
Dip tin: Apply tin to the joints to facilitate the insertion of the circuit board.
Equipment required: automatic tin dip tin machine, single and double head tin dip tin machine, wire cutting tin tin machine.
Process requirements: The tinning is even, no loose wires are allowed, and the tinting depth meets the requirements.
7. Assembly: Assemble the plastic plug shell
Equipment needed: Electric screw machine.
Process requirements: Screws are not allowed to expose the surface of the rubber shell; they must reach the required torque of the product.
8. Continuity test
Use the instrument to carry out the continuity test of the wiring harness.
Equipment needed: Continuity tester.
Process requirements: Short circuit and open circuit, wrong wiring, poor contact, poor insulation, etc. are not allowed.
9. Packaging
Use plastic bags to encapsulate the finished wire harness and pack it into a carton.
Equipment needed: sealing machine and packing machine.
Process requirements: The sealing should be flat; the packing belt should be tightly wrapped in the carton, and it is not allowed to fall off.
Introduction of each button function of the wire stripping machine
Power switch: used to switch the power of the machine

For other buttons, please see the detailed example in the picture below
System button: enter the setting system
Arrow up: used to increase the parameters, such as: increase the stripping speed
Arrow down: used for parameter reduction
Arrow left and right: move left and right when the menu is selected
Program button: enter the stripping program setting
Button 0: Stripping parameter settings, such as depth, length, etc.
No. 1 button: setting of processing speed
Button 2: Setting of twisting parameters
No. 3 button: Multi-segment peeling settings, such as: front end, a certain segment of peeling
No. 4 button: reset the set parameters
No. 5 button: reset the processed quantity
Button 6: switch between long-line/short-line mode
No. 7 button: single-segment/multi-segment template switching
Button 8: Set the processing output (it will stop automatically after the output is completed)
Button 9: Function setting of portable powered electric wire stripping machine
Sample button: stop after the whole process of production once, used for product samples
Run button: the computer wire stripping cutting machine starts to automatically produce according to the setting
Stop button: stop running Emergency stop button: used for special situations

Assembly of computer electric wire stripping machine
Accessory function
1. Inlet wheel
Conveying the wire and stripping the wire. When stripping short wires, the stripping machine has both the stripping head and the stripping tail. In addition to the stripping head, it also has the function of stripping the middle.

2. Outlet wheel
For the wire peeling machine to transport the wire and strip the tail.

3. Inlet wheel gap adjustment knob
Adjust the wire inlet wheel gap of the stripping machine for electrical wire, turn the gap upward to increase the gap, and rotate it down to decrease the gap.

4. The pressure adjustment knob of the wire stripper inlet wheel
Adjust the pressure of the wire inlet wheel of the wire stripper. After pulling it out, turn it clockwise, the pressure of the inlet wheel will increase, and turn it counterclockwise after pulling out, and the pressure of the inlet wheel will decrease.

5. Raise the knob of the inlet wheel
when the wire stripper is threading, raise the inlet wheel, turn the knob clockwise to raise the inlet wheel so that the wire can be smoothly passed through; when working, lower the inlet wheel and turn the knob counterclockwise to lower it. Into the wire wheel, press the wire.

6. Outlet wheel gap adjustment knob
Adjust the outlet wheel gap for the cable peeling machine. Turn the gap upward to increase the gap, and rotate it downward to decrease the gap (adjust according to the thickness of the wire).

7. Outlet wheel pressure adjustment knob
Adjust the outlet wheel pressure for the wire stripper and rotate it counterclockwise after pulling it out, the outlet wheel pressure will increase, and after pulling out, turn it clockwise, and the inlet wheel pressure will decrease.

8. Lifting knob of outlet wheel
Lift up the outlet wheel when taking out the wire, turn the knob counterclockwise to lift the outlet wheel so that the wire can be taken out smoothly; lower the outlet wheel when working, and turn the knob clockwise to lower the outlet wheel.

The main reasons for the occurrence of computer wire stripping opportunities are improper device settings and excessive running time of the device. Take the pressure adjustment principle of the wire stripping machine as an example: the pressure of the inlet wheel is not enough, and occasionally the wire head cannot be peeled off. When the wire is severely crushed, you should check whether the crush comes from the incoming reel or the exit reel, and reduce the pressure of the corresponding wheel. The gap of the incoming reel is too large, and the gap of the incoming reel needs to be reduced. The incoming wheels have stolen goods and need to be cleaned up. When the material is cut out: the pressure of the upper roller is too small, adjust the pressure nut to increase the pressure.
9. Knife holder assembly
In the automatic cable stripping machine, it is responsible for the cutting, stripping and tailing of the wire. When the machine is stopped, the upper and lower blades need to be opened to the maximum so that the wire can pass the cutter smoothly.


Precautions for safe use!
In order to ensure that you can use the computer automatic wire cutter and stripper machine safely and correctly, please read this manual carefully before using it.
1. In order to stabilize the working voltage of the machine, please select a power supply regulator to avoid over-voltage and burn out the machine.
2. The machine should be placed on a flat and stable surface for operation, so as not to damage the machine from falling.
3. Please do not use the machine near the area with strong electromagnetic field, so as not to interfere with the machine.
4. Do not place any objects on the machine during use, and do not approach corrosive chemicals. Be sure to keep the working environment dry, ventilated, and dust-free, and the working room temperature: 0-35°C.
5. If the machine has unsatisfactory industrial cable stripping machine effect or malfunctions of different degrees during use, please read the malfunctions and troubleshooting methods in this manual. If it still can not be solved, please call our technical service telephone for maintenance methods. For your safety, please do not disassemble the machine for maintenance.
6. When the machine is operating, someone should take care of it to avoid messy wires and empty cutting of the machine;
7. During the cutting process, the finished product line is inspected regularly to adjust various parameters according to the actual situation
8. When an abnormality occurs, press the stop key once and the machine pauses; after the processing is completed, press the start key.
The wire stripping machine is one of the commonly used equipment in the machinery industry. It is used to cut the entire coil of wire to the required length and strip the wire; the manufacturer’s manual is relatively general, and it will be difficult to debug after the first use, which wastes wire and labor.
Juat like automatic powered wire stripping machine, but there are also many models of automatic portable wire stripping machine, so we should know more about the operation method of the automatic cable cutting machine of specific models. It is recommended to go to Dongguan Tangxia Linghanger Automation Equipment Factory for detailed consultation and understanding.
Many people want to know how to use wire stripping machine and how does a wire stripping machine work, So today I will introduce to you the basic steps and details of some automatic computer wire stripping machines.
The following are the detailed steps of how to use the computer wire stripping machine
1. Turn on the power switch on the the wire stripping machine, the wire stripping machine will start, and the setting screen lights will light up.

2. Press the up and down keys on the keyboard to select the program column, as shown in the figure.
The program means that if you have a kind of thread that will be cut repeatedly in the future, set this program and save it; in the future, directly select the program you defined and use it directly without setting it again.

3. Press key 1 in the keyboard to select the speed column, as shown in the figure
The speed is usually set to 05. If you want to be faster or slower when the machine is cutting normally, you can adjust the speed parameter to adjust; It is recommended not to be too fast, which is prone to errors

4. Press the No. 1 stripping setting button on the keyboard, as shown in the figure.
Then hold down the arrow key and right-click twice, the line length setting option is the line length setting option. The line length refers to how long you want to cut to, just set the number to how much, the unit is mm, don’t be wrong.

After the setting is completed, be sure to cut one piece, and verify whether the length is correct through the ruler on the machine (as shown in the figure), the machine still has an error after all, if possible, leave a little margin
The output does not need to be set, but before the start, set the output to 0000; This function is equivalent to a counter, and you can intuitively see how many have been cut from the top.
How to set the Front S, Half Of Front S, Back S, and Back half. Press the left and right keys in the keyboard to select the Front S, Half Of Front S, Back S, and Back half, as shown in the figure.

Here directly explain the four items together
Front S
Means front stripping means the length of front stripping, it refers to how many millimeter of the front end of the finished line is stripped after cutting. Set it according to your needs. There is no standard answer.
Half Of Front S
Means half of front stripping, it refers to how many millimeters of the front end of the finished line will be removed after cutting. If the number is set to be greater than the number of the Front S, all will be stripped, and vice versa.
Back S
Refers to how many millimeters of the rear end of the finished wire will be stripped after cutting. Set it according to your needs. There is no standard answer.
Back half
Refers to how many millimeters of the rear end of the finished wire are removed after cutting. If the number is set to be greater than the number of the wire Back S, all of it will be stripped off, and vice versa;

For example 1: (see the picture below) 
Assuming that position 1 is the head of the wire, and position 2 is the tail of the cable, because the head of the wire at position 1 has been completely stripped off. So, If Front S is set to 2 cm, then Half Of Front S must be 2 cm or more.
In the same way, assuming that position 1 is the head of the wire, and position 2 is the tail of the cable, because the tail of the wire at position 2 is completely stripped off. If the Back is set to 2 cm, the Half Back S must be 2 cm or more.
So Then there will be a stripping situation as shown in the figure.
For example 2: (see the picture below)

Assuming that position 3 is the head of the wire, and position 4 is the tail of the cable, because the head of the wire at position 3 has not been completely stripped off, if the Front S is set to 2 cm, the Half Of Front S must be less than 2 cm.
In the same way, assuming that position 3 is the head of the wire, and position 4 is the tail of the cable, because the tail of the wire at position 4 has not been completely stripped off. If the Back is set to 2 cm, the Half Back S must be less than 2 cm.
In this way, the stripping situation as shown in the figure will appear
For example 3: (see the picture below)

Assuming that position 5 is the head of the wire, and position 6 is the end of the cable, because the the head of the wire at position 5 is completely stripped off, if you set Front S to 2 cm, then Half Of Front S must be 2 cm or more.
In the same way, assuming that position 5 is the head of the wire, and position 6 is the tail of the cable, because the tail of the wire at position 6 has not been completely stripped off. If the Back is set to 2 cm, the Half Back S must be less than 2 cm.
In this way, the stripping situation as shown in the figure will appear.
For example 4: (see the picture below) 
Assuming that position 7 is the head of the wire, and position 8 is the end of the cable, because the wire at position 7 has not been completely stripped off, if you set Front S to 2 cm, then Half Of Front S must be less than 2 cm. In this way, the stripping situation as shown in the figure will appear
In the same way, assuming that position 7 is the head of the wire, and position 8 is the tail of the cable, because the tail of the wire at position 8 has been completely stripped off. If the Back is set to 2 cm, the Half Back S must be 2 cm or more.
In this way, the stripping situation as shown in the figure will appear
The Computer Wire, Continue down, select quantitative
Quantitative refers to your target demand. For example, if 1000 pieces are set to 1000, the machine will automatically complete the output of 1000 pieces and then stop. Of course, you must prepare enough wire, because even if there is no wire, the machine will cut empty. It will affect your output at that time.
Here, batch and delay are introduced together. The batch is set to 100, and the delay is set to 05; each time the machine counts to 100, it will stop for 5 seconds. The purpose is to give you 5 seconds to take away 100 threads and tie them up.
The next step is how to set the knife value and back knife that is to say how to set the wire diameter, this item is particularly important; (knife value, back knife)
First, set the corresponding parameters according to the specifications of the wire. You must cut one piece, and observe the cut end and end of the thread.

1. If it is not cut cable sheath, the knife value is too big and needs to be adjusted down.
2. If the copper core is cut or cut, the knife value is too small and needs to be increased;
3. Try two more, adjust to the best;
4. Adjust the quantitative to 0001, and the machine will only cut one piece. After the adjustment is completed, set the batch parameters;
Let me give you a tool value, reference value of tool retraction and line square number (small adjustments of specific values need to be adjusted according to the actual situation)

After the setting is completed, go online; as shown in the figure

1. The S-shaped wire passes through the roller, and the adjusting screw presses the wire.
2. The function of the straightener is to straighten the wire, especially the bent wire. If it is not straightened, it will cut badly.

3.The next step is to adjust the front and rear wire feed wheels; as shown in the figure.

4. Pass the wire through the front wheel and adjust to compress the wire, preferably the printing that can be pressed out of the roller;

Its function is to feed the thread. If it is not pressed tightly, the thread cannot be sent in and the machine can only cut it empty.
5. The same pressure adjusts the rear wheel.

The role of the rear wheel is to take up the thread, if it is not pressed tightly, the thread tail will not be cut out.
Maintenance of wire stripping machine
Before work
1. The wire skinner machine should be used and maintained by a dedicated person, and it is strictly forbidden for untrained personnel to operate it without authorization.
2. Check whether the power cord and power plug are damaged.
3. Inject 2 to 3 drops of lubricating oil into the oil filling hole of the small wire stripping machine every day before use, and check whether the electrical appliances and transmission system are normal and reliable.
At work
1. Plug in the power plug, turn on the power of the wire stripper, and observe whether the device has power.
2. Determine the wire specification parameters and set the shearing knife value.
3. Adjust the distance between the cutter and the stripper according to the stripping requirements to determine the length of the wire.
4. Put the wire into the wire clamping roller, and adjust the tightness of the roller to not loosen and not clamp the wire.
5. When the electric cable stripping machines is turned on and working, no debris or tools should be stacked near the moving parts.
6. After confirming that it is correct, perform manual experiment operation first, and then select the run button to automatically open the line.
7. The protective cover of the automatic wire stripping machines must be placed in place for automatic operation.
8. When the copper wire peeling machine is working, it is not allowed to reach under the protective cover, and it is strictly forbidden to directly remove the wire stripped by the cutting machine from the clamping frame by hand.
9. During the operation, if the automatic cable cutting and stripping machine is abnormal, you need to turn off the power first and report for repair in time.
10. When replacing the wire, you must disconnect the power first, confirm that the parameters meet the requirements, and then perform the replacement operation. It is strictly forbidden to replace it during the operation of the copper cable stripping machine.
11. Refer to the equipment manual for operation settings.
if you want to know more about how to steps please clikc at How to Use an Automatic Computer Wire Strippeing Machine: An In-Depth Guide with video guide step by step
After work
1. After the work is over, turn off the power switch of the equipment and unplug the power plug.
2. Remove the wire stripping waste, keep the knife edge of the semi automatic wire stripping machine clean and the surface of the equipment clean, and apply anti-rust oil.
3. After the work site is confirmed to be clean, the work task can be ended